How to install VNC on Ubuntu 18.04 (TightVNC Server)
This tutorial explains How to Install VNC Server on Ubuntu 18.04. VNC (Virtual Network Computing) is a remote desktop sharing tool that allows you to remotely access the graphical desktop of your Ubuntu system.
To set up VNC on your Ubuntu computer, we need to install Xfce desktop and a VNC server software. There are a couple of VNC server software available for Ubuntu 18.04, we are going to use the TightVNC server server package.
Requirements
Xfce4 desktop and tightvncserver package for Ubuntu 18.04 is available in the universe apt repository. If the universe apt repository is not enabled, enable it by running the following command:
sudo add-apt-repository universe
sudo apt-get update
Perform the following steps to install and configure TightVNC on Ubuntu 18.04
Run the following command to install Xfce desktop:
sudo apt-get install xfce4 xfce4-sessionOnce Xfce is installed, install tightvncserver package using the following command:
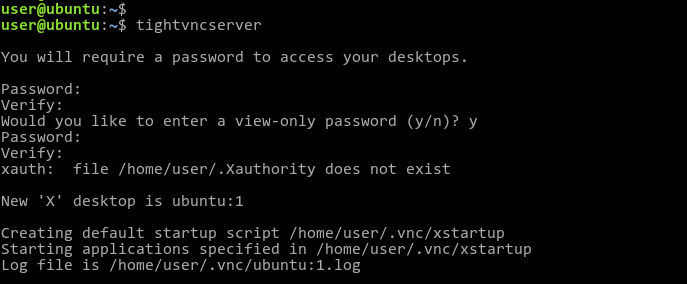
sudo apt-get install tightvncserverWhen installation completes, start a new VNC session by using the tightvncserver command:
tightvncserverWhen tightvncserver command executes for the very first time, you will be prompted to set up a password (we can change the password at a later time with tightvncpasswd command). The command will also create a few configuration files required for the Ubuntu VNC server.
Next, we need to stop the VNC server and edit startup script. First stop Ubuntu VNC server with following command:
tightvncserver -kill :1Then, open ~/.vnc/xstartup and make sure it is similar to following configuration:
#!/bin/sh

unset SESSION_MANAGER
xrdb $HOME/.Xresources
xsetroot -solid grey
[ -x /etc/vnc/xstartup ] && exec /etc/vnc/xstartup
[ -r $HOME/.Xresources ] && xrdb $HOME/.Xresources
startxfce4 &
Save the config file and start a new VNC session:
tightvncserver :1 -geometry 1366x768 -depth 24We have started a new VNC session with desktop ID 1 and 1366×768 screen resolution.
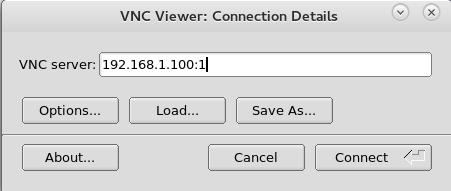
To access the server remotely, a VNC viewer software should be installed on the remote computer. Then, use your server IP address and a VNC desktop number to be connected.

Start and Stop Ubuntu VNC Server
To start a VNC session with desktop ID 1, run:
tightvncserver :1 -geometry 1366x768 -depth 24We can use different desktop ID’s to enable multiple desktop sessions:
tightvncserver :2 -geometry 1366x768 -depth 24To manually stop the VNC Server on your Ubuntu 18.04 server, run the command tightvncserver -kill and provide the same ID you used when starting the VNC Server.
tightvncserver -kill :1Automatically Starting the VNC Server on Ubuntu 18.04
Perform the following steps to ensure that the Ubuntu VNC Server will automatically start when your Ubuntu 18.04 server rebooted.
Create a new systemd unit file called [email protected] under the /etc/systemd/system directory.
sudo vim /etc/systemd/system/[email protected]Insert the following lines:
[Unit]
Description=Start a VNC Session at startup With Desktop ID 1
After=multi-user.target network.target

[Service]
Type=forking
# IMPORTANT!!! Change 'username' to actual user that connect to the session
User=username
ExecStartPre=/bin/sh -c '/usr/bin/tightvncserver -kill :%i > /dev/null 2>&1 || :'
ExecStart=/usr/bin/tightvncserver :%i -geometry 1366x768 -depth 24
ExecStop=/usr/bin/tightvncserver -kill :%i

[Install]
WantedBy=multi-user.target
Reload the systemd and enable the [email protected]:
sudo systemctl daemon-reload
sudo systemctl enable [email protected]
Disable the service If you don’t want to start the VNC session when your Ubuntu 18.04 server rebooted:
sudo systemctl disable [email protected]